
You are likely already familiar with the excellent development tool LINQPad and if you are a Dynamics CRM Developer you, hopefully, are familiar with LINQPad Plugin for Dynamics CRM. Using LINQPad along with the LINQPad CRM Plugin is a great way to learn the ins and outs of writing LINQ queries for Dynamics CRM.
In this article I will show you how, with just a minimal of effort, you can start using LINQPad to directly call Dynamics CRM. This will allow you to go beyond just building LINQ queries and execute code to test Request/Response messages, QueryExpression retrieval, FetchXml, and much more. Using LINQPad allows you to test and learn in real-time without waiting to compile your code and execute your test cases (if you even have test cases! You do have test cases, right?)
Btw…if you end loving LINQPad you should really consider buying a license to unlock auto-completion. In fact, you can outfit your entire company with Premium Edition (all the features) for only $750 (as of 10/31/2013.) See the current comparison and pricing here: http://www.linqpad.net/Premium.aspx. (My only complaint is that they have activation limits – which are generous but seem like a real annoyance when you go through a couple dozen VMs in a year and have 4 to 5 active at any time. All dev products should license per Dev the same as ReSharper.)
Installing LINQPad
Lets get started…
- You must also have [.NET 4](http://www.microsoft.com/en-us/download/details.aspx?id=17851) and (possibly) [Windows Identity Foundation](http://www.microsoft.com/en-us/download/details.aspx?id=17331) installed. (This is usually a given on a CRM Dev machine, but I add it for completeness.)
- Start by downloading LINQPad from [www.linqpad.net](http://www.linqpad.net) and installing the application.
Note, I will not discuss the LINQPad Plugin for CRM in this article. I highly recommend checking it out at the link above and using it. It is extremely useful and a great way to learn to write LINQ queries and test them against Dynamics CRM.
So we now that we have everything installed it is time to fire up LINQPad.

Getting a Connection
The first thing we need to do is create a connection to the Dynamics CRM server and to do so we’ll use some CRM SDK functionality (that I discovered last year thanks to this great blog post from Shan McArthur of Adxstudio) to ensure support for any valid authentication setup (on-prem AD/on-prem Claims/partner hosted/Microsoft hosted.)
In the bottom left corner of LINQPad under My Queries locate the My Extensions document and double click to open it.
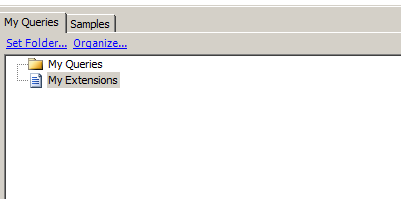
You should now see the following:
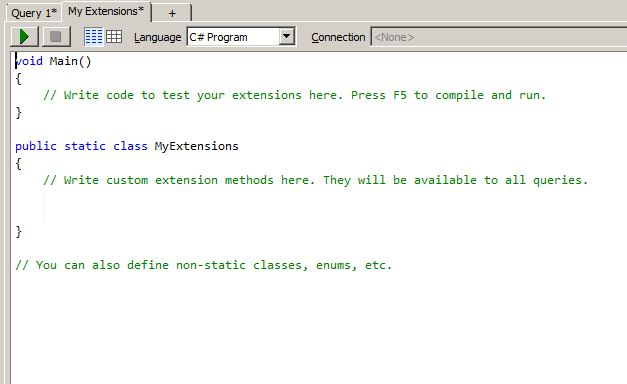
In the MyExtensions class paste the following code:
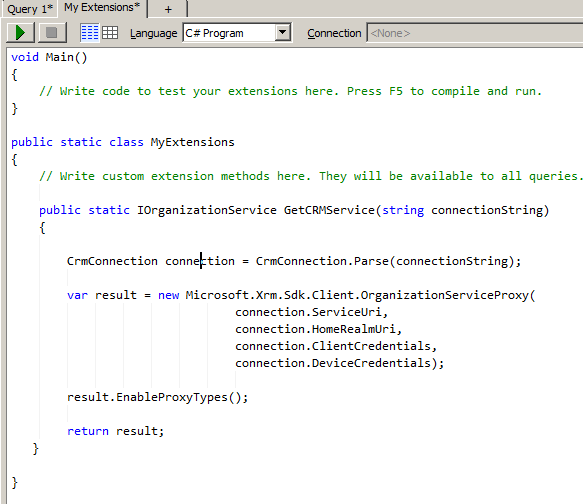
public IOrganizationServic GetCRMService(string connectionString) { CrmConnection connection = CrmConnection.Parse(connectionString);
var result = new Microsoft.Xrm.Sdk.Client.OrganizationServiceProxy( connection.ServiceUri, connection.HomeRealmUri, connection.ClientCredentials, connection.DeviceCredentials);
result.EnableProxyTypes();
return result; } This is what it should look like:
If you are wondering about why I did it this way it was so that I could get an IOrganizationService object that had proxy types enabled (which will be needed for a future blog article). Since I don’t have an assembly where I can set this value this is the only method I found. If you know a better way please leave a comment below.
If you hit the green arrow at this point you’ll get an error telling you “The type or namespace name ‘Sdk’ does not exist in the namespace ‘Microsoft.Xrm’ (Press F4 to check imported namespaces)” – since LINQPad doesn’t know to include these automatically, how could it, we have to add the necessary references and using statements. Note, if you have purchased the premium/pro version much of this will be done automatically – but I have intentionally written this for the 1st time user still testing out LINQPad.
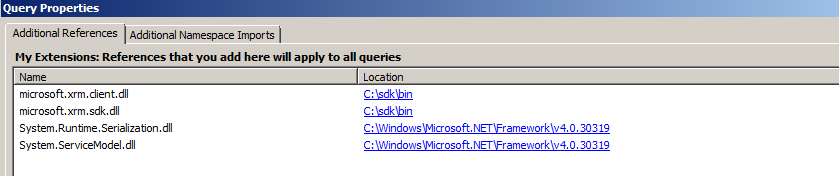
Press F4 or right-click on the window to open the Query Properties window:

From the Query Properties window click the Add button and add System.Runtime.Serialization.dll and System.ServiceModel.dll. Then use the Browse button to add the microsoft.xrm.client.dll and the microsoft.xrm.sdk.dll.
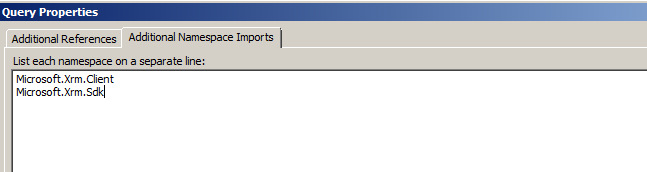
Next click on the Additional Namespace Imports tab. Add Microsoft.Xrm.Client and Microsoft.Xrm.Sdk, each on their own line. Then press Ok to close the window.
WhoAmIRequest() or CRM’s Hello World
We are now ready to start playing. I’ve always thought of a WhoAmIRequest() as the Dynamics CRM equivalent of hello world, so that’ll be our first set of commands.
Go back to the Query 1 tab or click the plus (+) sign to get a new blank query tab. Be sure the Language drop-down is set to C# Statement(s).
Into this screen paste the following code:
var response = (WhoAmIResponse)conn.Execute(new WhoAmIRequest());
Before you can run this code you must add the a reference to* microsoft.crm.sdk.proxy.dll* and an additional namespace import of Microsoft.Crm.Sdk.Messages (press F4 and follow the instructions from above.)
Lastly, fix the connection string in the first line to point to the correct CRM server and organization. You can pass credentials as part of the connection string, if necessary. To learn more about the CRM connection string refer to the SDK for details and examples.
Now click the green arrow ( ) in the top left to execute your code. If your connection string is correctly written you should see a response similar to this one:

As you can see we have executed a WhoAmIRequest and displayed the results in an easy to navigate/view format. Let me tell you, when working with unfamiliar message request/response types in the CRM SDK being able to see what a request is really returning data-wise can be absolutely invaluable and save you many hours of headache inducing debugging.
Dump() This
That last line of results.Dump() may look confusing since, as you are probably aware, there is no Dump method on the WhoAmIResponse() class. The Dump() method is made available through LINQPad and it is what tells LINQPad to take an object visualize it. Now, I’ll show you what it can do with a more significant amount of data.
What Will This QueryExpression Get Me
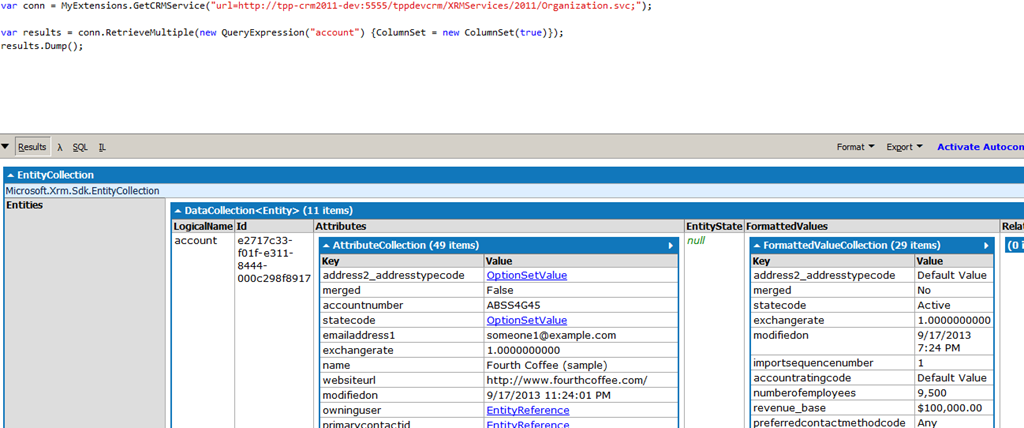
Click the plus (+) to open a new query window and paste the following code: var conn = MyExtensions.GetCRMService(“url=http://tpp-crm2011-dev:5555/tppdevcrm/XRMServices/2011/Organization.svc;”); var response = (WhoAmIResponse)conn.Execute(new WhoAmIRequest()); response.Dump(); Hit F4 to add Microsoft.Xrm.Sdk.Query as an additional namespace (this should be old hat by now) and then click the green arrow or press F5 to run the code.
The query will execute and be visualized allowing you as s developer to know exactly what will be returned – I find seeing the objects with data to be much easier than the standard CRM SDK documentation.
And don’t think for a minute that you are limited to simple three line code. From the query window that just executed press CTRL + SHIFT + N to open a new query window with the same setup as the current (avoiding having to add a namespace reference.) Now past the following code and let it run: var conn = MyExtensions.GetCRMService(“url=http://tpp-crm2011-dev:5555/tppdevcrm/XRMServices/2011/Organization.svc;”);
var query = new QueryExpression(“account”); var colSet = new ColumnSet();
colSet.AddColumn(“name”); colSet.AddColumns(“modifiedon”,“createdon”,“modifiedby”,“createdby”); query.ColumnSet = colSet;
query.AddOrder(“name”, OrderType.Ascending);
var results = conn.RetrieveMultiple(query);
results.Dump();
Conclusion
If you weren’t already using LINQPad I hope that this article got you interested in giving it a try and if you are already using LINQPad, but not in this way, I hope you’ll explore these new options. I’ve been meaning to write a few LINQPad posts for over past 18 months and finally decided to get the first one done. I did this mostly so I don’t have to repeat myself in getting developers setup using LINQPad. I’ve simply found it to be one of the most valuable tools in getting my CRM-related code correct the first time.
As soon as I get time I’ll post a follow-up showing how to use your application’s specific early-bound entities with LINQPad.
I welcome comments/questions/corrections/etc. in the comments area below. Thanks for reading.